Overview
By the end of this guide, you'll have created a simple workflow that takes text input, processes it with an AI model, and displays the AI-generated response. This demonstrates the core concepts of ORCFLO in just a few minutes.
Prerequisites
Before starting, make sure you have:
- An ORCFLO account (free tier works great)
- Basic understanding of what workflows are
1. Access the Workflow Builder
From your dashboard, click the "New Workflow" button or navigate to Workflows → Create New.
Give your workflow a name like My First Workflow and click Create.

2. Add Your Nodes
You'll see an empty canvas ready for you to build your workflow. Use the component library to drag and drop nodes onto the canvas.
Add three nodes to your canvas:
- Input node:The workflow's entry point
- AI Model node: Processes input with AI
- Output node: Displays the results

Pro Tip
The node picker is searchable! Just start typing to filter available nodes.3. Configure the Input Node
Click on the Input node to open its configuration panel on the right side of the screen. This is where you'll define the data that flows into your workflow.
Enter this sample text in the Input node's text field:
Artificial intelligence (AI) is intelligence demonstrated by machines,
as opposed to natural intelligence displayed by animals including humans.
AI research has been defined as the field of study of intelligent agents,
which refers to any system that perceives its environment and takes actions
that maximize its chance of achieving its goals.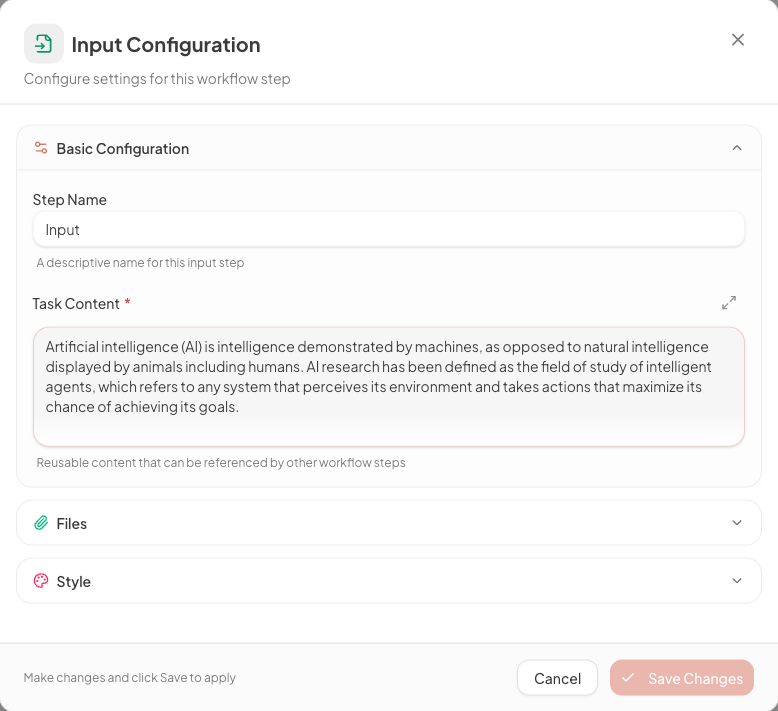
Input Node
The Input node defines what data your workflow will process.4. Configure the AI Model
Click on the AI Model node to open its configuration panel. This is where you'll tell the AI what to do with your input.
Model
Select a model (e.g. Claude Haiku 4.5) from the center of the step.
Task Instructions
Write the task you want the AI to perform. The input data will be automatically passed to the AI.
Enter this task in the Task Instructions field:
You are a helpful assistant that summarizes text concisely.
Please summarize the provided text in 2-3 sentences, capturing the main points.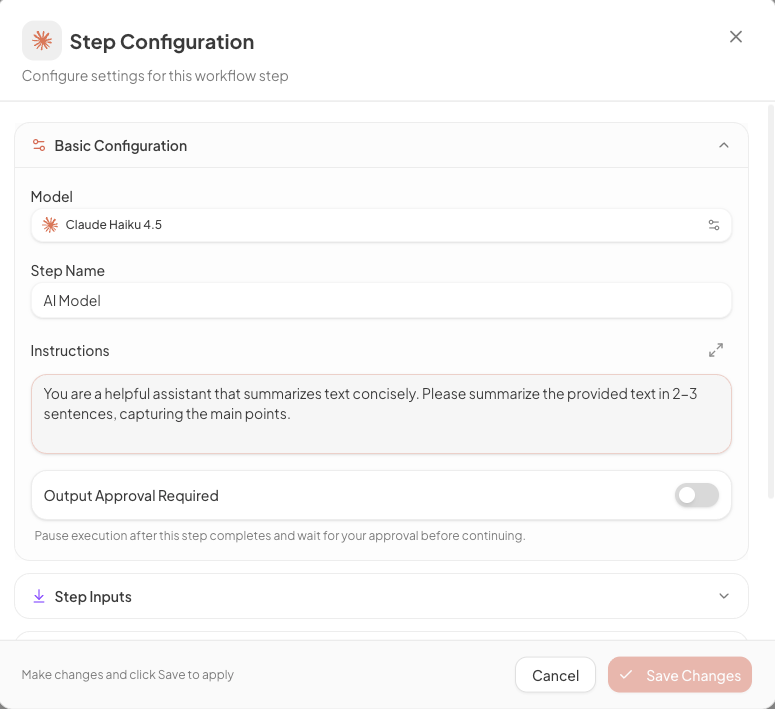
5. Connect the Nodes
Now you need to link your nodes together so data flows from one to the next:
- Hover over the Input node to see its output handle (small circle on the right)
- Click and drag from the handle to the input of the AI Model node
- Repeat to connect the AI Model node to the Output node
Your workflow should now show: Input → AI Model → Output
6. Execute Your Workflow
Time to see your workflow in action! Click the Execute button in the top toolbar.
When execution starts, an Execution Pane automatically opens on the right side of the screen. This pane shows real-time progress as each step runs:
- Watch each step's status update in real-time (pending → running → completed)
- Click on any step to view its input and output data
- See the final AI-generated summary in the Output step's results

Debugging Tip
The execution pane is your best friend for debugging! Click on any step to inspect exactly what data flowed in and out. If something goes wrong, you'll see the error message right there.Congratulations!
You've built your first AI-powered workflow! This simple example demonstrates the core concepts of ORCFLO. From here, you can add more nodes, create branches with conditional logic, connect to external services, and much more.
Next Steps
Ready to go deeper? Here are some recommended resources:
- Core Concepts - Learn the fundamental building blocks
- Understanding Workflows - Deep dive into workflow architecture
- Node Types Explained - Explore all available nodes
- Browse Blueprints - Get inspired by examples